
The short answer is: Technically false, practically true.
I mean, technically you could go camping in the wild with a Lamborghini fitted with a rooftop tent and a trailer: for sure is fast to get to your destination and hop in the tent, but practically… any rusty pickup will be far better every day of the week.

Do You Need To Level The Tripod?
Technically, you don’t. The only requirement for polar aligning the Star Adventurer is that you need to level the reticle, not the mount itself.
This means you need to be able, looking at your reticle, to pick a vertical line to the ground so as to define the 12, 3, 6, and 9 o’clock positions for your reticle orientation. Mind that these positions may not be where you see the 0, 3, 6, and 9 numbers. The numbers you see in the reticle have no meaning per se.
The reason why you need to define your reticle orientation is that Polaris has to be placed on the reticle in a precise position and such precise position is defined with respect to the 12, 3, 6, and 9 o’clock positions for your reticle orientation.

Kneeling on the ground, I see the reticle rotated like this. But which mark represents the 12 o’clock position for this reticle orientation?
Misjudging the reticle orientation when contorting in the dark, trying to look inside the polar scope, trying not to knock everything on the ground, and while manipulating the wedge is easy. And this will introduce an error in your Polar alignment, whether you are using the graduation circles at the back of the Star Adventurer or an app showing you where to place Polaris on the reticle.
Moreover, eyeballing your reticle orientation is not a reliable nor a consistent way to perform your polar alignment: sometimes you’ll get lucky and will nail it, other times you will struggle to understand why your stars trail since you believe you have got your PA right (but you didn’t actually).
So how would you eyeball the 6 o’ clock position for the case shown below?
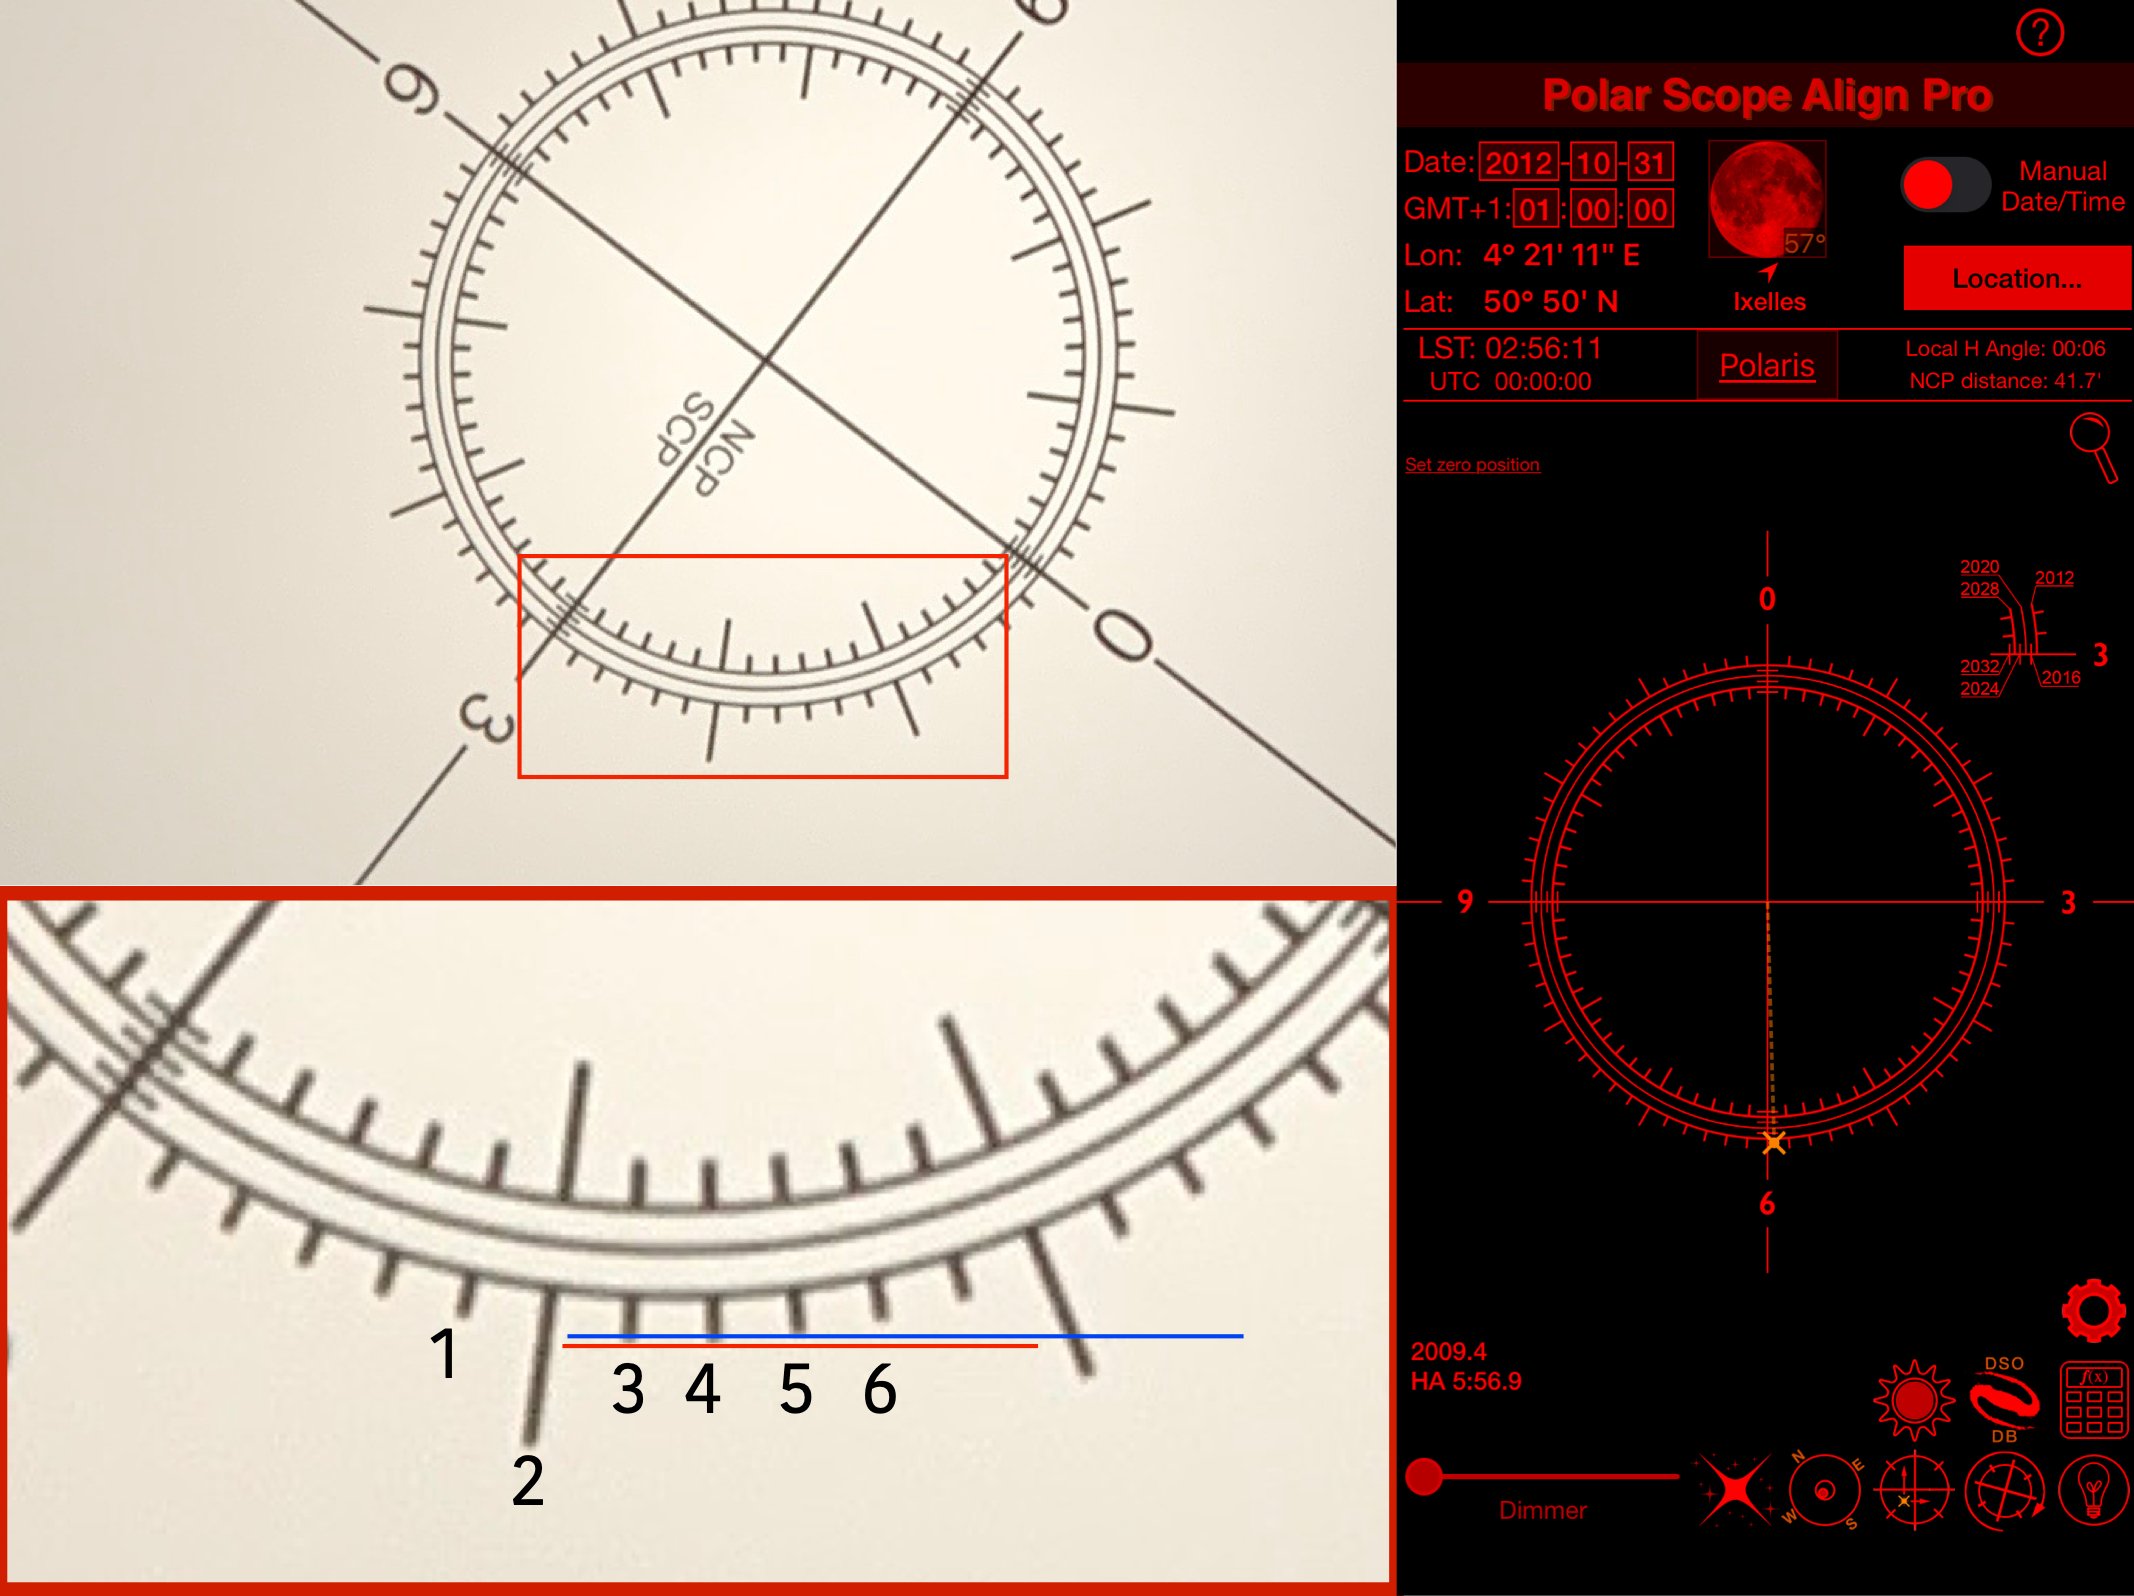
Let’s play “Eyeball the 6 o’ clock” …
The reticle is randomly rotated, the app tells you Polaris should be placed few degrees before 6 o’ clock. Now, in the dark, wobbling and contorting to look through the polar scope, you have to eyeball where 6 o’clock is for the reticle oriented this way, while manipulate the wedge to place Polaris in the proper position. How difficult will it be?
Well, let’s have a look at the magnified lower portion of the reticle, the one where 6 o’clock is supposed to be: one way to find this position is to look for the mark that ends below any other mark. Clearly, mark 1 and 6 are not at 6 o’clock. But mark 2, 3, 4, and 5 are all good candidates.
Even with a computer, drawing reference lines on pictures, I can’t tell wether 6 o’clock is at mark 3 or 4. And between the two there are 5 degrees difference.
Statistically, I would consider 6 o’clock to be in between marks 3 and 4 and I would put Polaris on the 4. And this is guesswork, much easier done in front of a computer then in the field.
Now, if you do wide field astrophotography with a full frame camera (the short the focal length of the lens and the larger the pixels the lower the image resolution, the better the chance to have round stars), this is not gonna be a problem and the resulting alignment is precise enough.
But you get the idea of the challenge you have to face when eyeballing your reticle orientation.
I mean, we are trying to make polar alignment simpler, right? So this is what you should do instead of “just eyeball Polaris position”, as far too many people seem to prefer and suggest.
The Proper Polar Alignment Procedure
The fastest, simplest, most reliable, and most consistent way to polar align your Star Adventurer is to use this particular starting position for the PA procedure, every time you are out in the field:
Set the Star Adventurer to Midnight, October 31st with zero degrees offset from the local standard time meridian (LSTM).
Level the mount. If you look into the polar scope, you’ll see the reticle appears oriented as a wall clock, with the numbers 6 and 6 o’clock and the 0 at 12 o’clock. You can check this at home against the edge of a distant building to be sure the reticle is calibrated.
Now you can use the graduation circles to polar align: set your actual date, time and location and place Polaris in correspondence of the number 6 of the reticle, wherever this is.
Or you can use an app such as Polar Scope Align Pro to place Polaris on the reticle where the app tells you. These apps all displays on the screen your Star Adventurer reticle oriented as a normal wall clock (0 at 12 o’clock, etc.).
By setting the Star Adventurer as said before, the reticle is oriented exactly as you see on the screen of your phone. Nothing to eyeball.
What is faster and more precise than “what you see in the app is what you get in the polar scope”? For sure not eyeballing Polaris position.
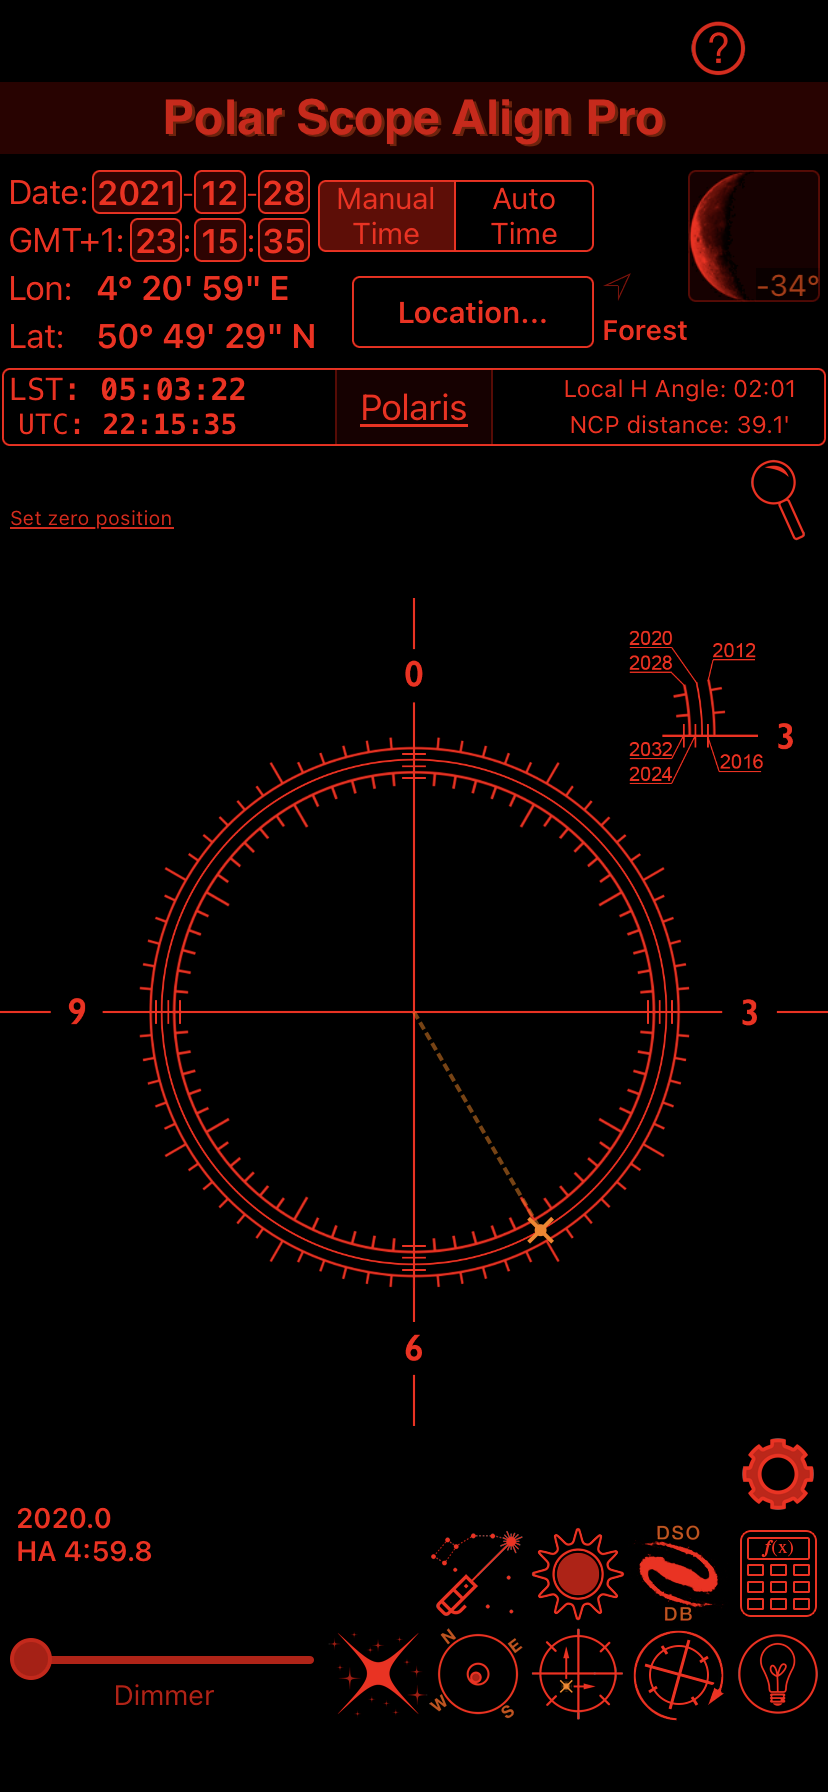
The main screen of Polar Scope Align Pro: the yellow dot indicates where Polaris goes on the reticle, with respect the 12-3-6-and 9 o’clock for this reticle orientation (a classic wall clock orientation).
But if you leave the reticle randomly oriented and go eyeballing Polaris position, you will loose the possibility to easily use some advanced features your polar alignment app may have.
For example: since the reticle rotates with the payload after you frame your target, you can use the graduation scales at the back of the Star Adventurer to know how many hours and minutes you have rotated your gear in Right Ascension.

The Rotated Reticle View screen in Polar Scope Align Pro.
You can input this rotation into Polar Scope Align PRO so that the app will show on screen the reticle oriented exactly as it is in the polar scope. Again, what you see in the app is what you get in the polar scope and you can now easily verify and refine the polar alignment as the very last thing before start your imaging session.
To keep in check your polar alignment over time, you can even tell the app to start tracking, so that the reticle will keep rotating on screen in real time, thus matching what you see in the polar scope.
Video Tutorial
Here is a more in-depth discussion and demonstration on how to polar align the Star Adventurer in the northern hemisphere. Please note that, once again, eyeball stuff on a computer screen is easier than in the field… in the video I got quite lucky.
Conclusions
Nobody says to go crazy with leveling the tripod: this operation should not take you more than 20s top.
We may be willing to travel for hours to reach a dark spot and be prepared to image many hours in a freezing cold night. Don’t skip the basic and fundamental step of setting up your mount properly just to save a few seconds.
Level the tripod and set the star adventurer to October 31st, midnight with zero degrees offset from your LSTM will not take you more than 30-40s, and will give you the best chances to achieve the best polar alignment for the precision allowed by your gear.
There are other things that will affect your image quality more than a not perfectly leveled mount: the periodic error of the mount, the balance of the payload, and the precision of the reticle itself, for example. Why add more guesswork to the mix?
Easy-peasy.
Related Topics
How To Polar Align The Star Adventurer To The NCP Using The Graduation Circles
If you want to know more about the use of the declination circles to polar align your Star Adventurer to the NCP, have a look at this post.
Learn More About Polar Alignment
if you want to know more about why polar alignment is important and how does it work, I wrote a very detailed, but easy reading, guide here on NightPixSky. If you are new to astrophotography, you should have a look at that guide.
Learn More About Your Star Adventurer
Do you want to be a happy owner Of the Skywatcher Star Adventurer? If so, have a look at the Ultimate Guide To The Star Adventurer I wrote for NightSkyPix.
The mount is not difficult to use, but with a few extra tips and tricks, you will be able to get the most out of it with ease.