
First thing first. I am a Mac user since the age of the glorious iBook 12” g4 and I am NOT trying to open the IT version of the proverbial Pandora’s box about Windows Vs Mac: which one is better.
It is undeniable that for Windows users there is a much greater choice of software, particularly so when it comes to freeware astrophotography software. Want to benefits from all the popular applications for astrophotographers but you are stuck with a Mac? Enters CrossOver.
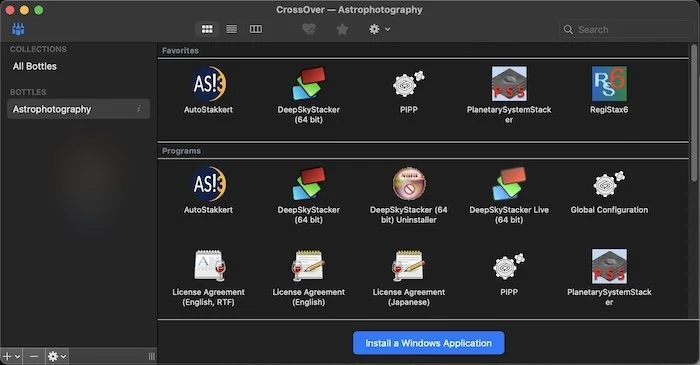
The Astrophotography bottle I created with CodeWeaver’s CrossOver.
Why CrossOver? Can’t I Just Use Wine?
WineHQ is free and is often updated, but you may not find it easy to install and set up. I myself failed to install it on my fresh M1 Macobook PRO 13”: after a few attempts, I gave up (yes, this is also my working computer and didn’t feel to mess around too much with it).
With CrossOver, the people from CodeWeavers have created a neat and easy way to install and use Wine to run a good number of Windows software on both Intel and M1 Mac computers.
At 59 euro, I feel it is reasonably priced: it is cheaper than most virtualization software and it spares you from the cost of buying a Windows license.
The two-week trial period is very welcome and it allows you to test all the software you intend to use.
Why Do I Need Windows Software? Isn’t There Software For Mac?
Sure there is, and is great too:
Lynkeos: for planetary astrophotography, free;
oa capture / oa live: planetary image acquisition software, free;
Starry Sky Stacker: for deep-sky astrophotography, commercial with trial period;
Starry Landscape Stacker: to stack and mask the sky when doing starry landscapes, commercial with trial period;
Nebulosity: for deep-sky astrophotography, freeware as of November 2021
Then there is cross-platform software:
SiriL: for deep-sky astrophotography, free;
ASTAP: for deep-sky astrophotography, free;
Planetary System Stacker: for planetary astrophotography, free;
Astro Pixel Processor: for deep-sky astrophotography, commercial;
PixInsight: for deep-sky astrophotography, commercial;
StarTools: for deep-sky astrophotography, commercial;
ZWO ASI Studio: planetary/deep-sky image acquisition software, free;
FireCapture: planetary image acquisition software, free;
And more info about using a Mac for astrophotography can be found on the Mac Observatory website.
So, Why Would I Want To Install Windows Software On Your Mac?
There are several reasons for wanting to run Windows software on a Mac:
The classic, easy to use, and widely popular freeware software (DSS, PIPP, Autostakkert!, Registax, and Sequator) are Windows only;
Many firmware uploaders for astrophotography gear are Windows only;
Expand your array of astrophotography tools you can use;
Dude, If You Want Me To Run Windows Stuff On My Mac You Need To Be More Specific Than That!
Ok.
Take planetary astrophotography: on a Mac you are pretty much limited to Lynkeos and Planetary System Stacker (PSS).
Lynkeos, although it offers some advanced post-processing tools, does not use alignment points. It does though use multiple alignment squares, but you have to manually add them. PSS gives often better results in terms of stacking quality than both Lynkeos and Autostakkert!3 (AS!3), but is not the easiest program to install. Finally, there is nothing in the Mac universe that comes close to Planetary Imaging PreProcessor (PIPP), although a small subset of PIPP functionalities can be found in SER Player.
Next, most of the software for Mac is commercial: from the “top of the class apps” Astro Pixel Processor (APP) and PixInsight (PI) to the more modest like Starry Landscape Stacker (SLS) and Starry Sky Stacker (SSS).
And if Deep Sky Stacker (DSS) can be replaced by ASTAP or SIRIL (which to date also offers a basic planetary stacking), it is still the best solution for beginners: easy to use, intuitive, flexible, and fast. Plus, DSS offers an easy way to drizzle your images and three different ways to stack images of comets. It is not a chance that DSS is the most popular option to stack and calibrate deep-sky astrophotography images.
And Sequator, with its ability to stack deep-sky astrophotography as well as starry landscapes (plus creating star trails), can efficiently replace SLS and SSS (both commercials) and Starstax (freeware).
3-Ways To Use Windows Software On Mac… Well, Sort Of
In theory, there are 3 ways to use Windows software on a Mac:
Create a partition with Bootcamp (free) and install Windows (commercial);
Use a virtualization software (free and commercial options available) to create a virtual machine and install Windows (commercial);
Use emulation software like Wine (free and commercial options available);
In practice things are a bit more complicated:
Bootcamp does not exist for the newer M1 Apple computers, only for Intel-based mac.
Virtualization software still hasn’t digested the M1 architecture (which is based on ARM and not Intel). At the time of this post, Parallels Desktop 17 (commercial) and UTM (free) are the only options that allow you to install a Windows 10 for arm computers (once you request a free membership in the Windows Insider Program).
Since Catalina, Apple killed the support for 32-bit applications, and for a long time, it was not possible to use emulators like Wine.
Wine has since caught up with Apple, supporting not only 64-bit Windows software but also the new M1 architecture and I am convinced that this is the best option you have today.
I don’t mind paying a reasonable price to have a useful tool in my astrophotography toolbox and I feel CrossOver is a must-have (and no, I am not sponsored by CodeWeavers.. I paid my copy in full).
Creating Your Astrophotography Bottle In CrossOver
Installing CrossOver is a brainless job, as with many Mac software.
Once installed, CrossOver allows you to create “bottles”, i.e. emulated Windows environment. Think of them as different, independent computers: you can have one bottle for your astrophotography editing, one bottle for applications you use at work, and one bottle for Windows games. Plus, each bottle can emulate a different Windows environment: XP, Windows 7 32-bit, Windows 7 64-bots, Windows 8.1, etc.
To create your bottle launch CrossOver, click on the “plus” icon at the bottom left of the interface and choose “Create a New Bottle”.

Creating a new bottle.
Give to it a meaningful name, such as “Astrophotography”. You can use the Windows 7 or Windows 10 64-bit bottle type.

Give the Bottle a name and set the type of environment to emulate.
How To Install The Software Inside Your Bottle
Once you have created your bottle, you can begin installing/running windows software, in one of the three following ways:
You install a supported application proposed by CrossOver. Most of the time this will make the installation process completely automatic;
Select your own installer for an Unlisted Application;
Run software directly from the bottle C: Drive;
Install Microsoft .NET Framework 4.8
EDIT 11/09/2022: Crossover 22 has been released recently and .NET is broken and will not install both via the automatic installer and the offline installer you can download from Microsoft. Will keep an eye on future updates to solve the problem. In the meanwhile, if you want to have PIPP running in Crossover, you have to stick to version 21.2.
.NET is used by PIPP to display the preview window. While the software will run without it, you will not be able to test the settings and see a preview if .NET is not installed.
Installing .NET is done in an automatic way.
Click on the “Install A Windows Application” button to lunch the CrossOver Software Installer.
Next, click on Browse All Applications.
from the Programming & Development Tools category select Microsoft .Net Framework 4.8.
Click on Continue.
Select the Astrophotography bottle we just created and click on Continue.
Finally, click on Install.

Installing Microsoft .NET 4.8
CrossOver will download all the required software, like the .NET Framework 2.0 with its service pack and .NET framework 4.0 before beginning the installation.
At some point you may be asked to reboot the computer: this will be your emulated computer, so, just click on Restart to continue installing the remaining software.
.NET installation should run smoothly until you hit a warning when installing the .NET 4.8 Framework: ignore this and continue with the installation.

When installing .NET Framework 4.8 you get this warning: you can ignore it and continue with the installation process.
Restart the computer for the last time and … Done.
Install and Run PIPP
EDIT 11/09/2022: Crossover 22 has been released recently and .NET is broken and will not install both via the automatic installer and the offline installer you can download from Microsoft. Will keep an eye on future updates to solve the problem. In the meanwhile, if you want to have PIPP running in Crossover, you have to stick to version 21.2.

Running PIPP in on my M1 MacBook Pro 13” with CrossOver.
PIPP comes with an installer, so go grab the latest 64-bit version of the program. Let’s see how to install the program:
Select the Astrophotography bottle from the list of available bottles;
Click on the gear icon at the bottom left of the window and choose “Install Software Into Astrophotography” from the menu.
Click on “Browse All Applications” and select “Unlisted application”. Click “Continue”.
Click on “Choose Installer File” to browse your computer looking for the PIPP installer. Once you found it, select it and click on “Use this Installer”. Then click on “Continue”.
Click on “Install” and follow the installing procedure as usual. You can install the UT Video Codec Suite as well when prompted.

Installing PIPP
The installation will take a few moments and when finished you will find the PIPP icon added to your Favourites in the CrossOver GUI. Double click on it to run the program.
Alternative MAC OS X Software: None.
Install And Run DSS

A test with few data images of the Bubble Nebula taken with my ZWO ASI224MC camera and Optolong L-Enhance filter.
DSS is installed in the same way as PIPP, but I was not able to make the latest version work properly in CrossOver. The most recent 64-bit version I was able to install and use is version 4.2.1.
There is a catch, though.
After loading your images and selecting them for calibration and stacking, as soon as you click on “Register Checked Pictures…” or “Stack Checked Picture…” you briefly see an error window popping up. Often this window immediately goes in the background before you could close it, blocking the program. To bring the error message back on screen, switch to another application (e.g. Finder) and come back to DSS.

The Error Message you will get when working in DSS. Click on OK to close the window, set the threshold for the star detections and continue with the calibration and stacking.
I suspect there is an invalid value in the default threshold detection of stars: click OK to close the error window and the Register Settings window will be displayed. ALWAYS go in the “Advanced” tab and increase the Star Detection Threshold from 0% to a suitable value (don’t forget to test it: you want DSS to detect about 200 stars).
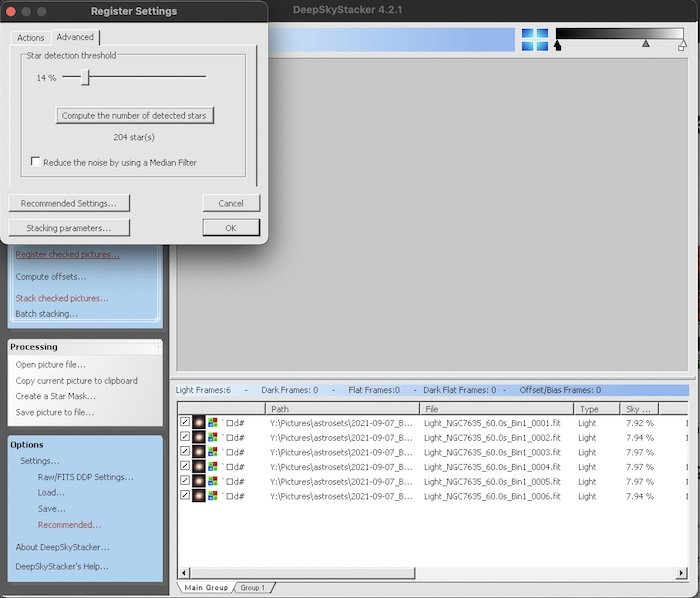
Setting the threshold parameter for the star detection.
Then continue as usual. All working versions of DSS, both 32 and 64-bit, are affected by this error and will show the annoying pop-up windows, but the program will work smoothly in producing your final image.
Alternative MAC OS X Software: ASTAP, SiriL, Starry Sky Stacker ($), Astro Pixel Processor ($), PixInsight ($), Nebulosity.
Install and Run Autostakkert!3

Running AS!3 on my M1 MacBook Pro 13” with CrossOver.
Autostakkert! does not come with an installer, but you run the program directly from its directory. Here is how to use it with CrossOver.
Select the Astrophotography bottle we created;
Click the gear icon at the bottom left of the interface and choose “Open C: drive”. Browse to the Program File directory and copy in there the distribution folder of the lastest version of AS!3 64-bit;

Copying Autostakkert! distribution folder into the bottle C: drive.
To create the link to launch the program, click again on the gear icon and this time select “Run Command…” Now browse your C: drive to find the executable of AS!3. Select it, and click on “Save command as a launcher”.

Adding Autostakkert! to Favourites.
Now you can run AS!3 simply by double-clicking on the icon you find in Favourites.
Alternative MAC OS X Software: Lynkeos, Planetary System Stacker
Install and Run Registax

Running Registax on my M1 MacBook Pro 13” with CrossOver.
Registax is installed from the installer, as done for PIPP. Download the latest version (6.1 32-bit) and the relative Update. Install the program first, then run the update as if it was an installer.
If you don’t find the Registax icon, choose “Run Command …” (as explained in the installation of Autostakkert) to browse your C: drive. When you locate the executable, typical in Program Files (x86), save it as a launcher.
While I’m afraid this software is abandonware, pretty much as Autostakkert!, it is still relevant, as it allows a nice wavelet sharpening and some advanced post-processing tools for planetary astrophotography.
The program works well, but it responds slowly to the changing of the settings when applying the wavelet sharpening.
Alternative MAC OS X Software: Lynkeos, Planetary System Stacker
Install and Run Planetary System Stacker

Running PSS on my M1 MacBook Pro 13” with CrossOver.
Planetary System Stacker is a neat, cross-platform, and free software to stack lunar, solar, and planetary images. It is written in Python and is still being actively developed.
The problem is that is not as user-friendly when to comes to installing it and I was not able to get the latest version installed on my MacBook Pro. The Windows version, on the other hand, comes in a neat self-contained installer, sparing you to mess around with Python modules and dependencies.
I am not suggesting buying CrossOver to run PSS but if I were you and already use CrossOver for running other software, I would definitely use the Windows version of PSS.
Since it comes in the form of an installer, you can refer to the installation of PIPP I have discussed earlier in the article.
Alternative MAC OS X Software: Lynkeos
Install and Run Sequator

Running Sequator on my M1 Macbook 13” with CrossOver.
Sequator is another favorite among astrophotographers working with Windows. While it can stack deep sky images and create star trails, its selling point is the ability to stack starry landscapes images.
The latest version (1.60 64-bit) works flawlessly in CrossOver and, since it does not come with an installer it should be used in CrossOver is explained for Autostakkert!.
Alternative MAC OS X Software: Starry Landscape Stacker ($, for starry landscapes only)
Running The Sky-Watcher Firmware Uploader

Updating the Motor Control Unit Firmware of my Skywatcher Az-GTI mount.
Maintaining astrophotography gear it also mean to stay update with the latest version of the Firmware, particularly for the mounts. The problem is those installers are almost always for Windows only.
While updating a firmware is not something one usually do every day, you may still want to have the possibility to do it when needed. I have the Skywatcher Az-GTI and it is a period now where there is a new firmware release every other week (as there were few guiding issues to solve).
The SkyWatcher firmware uploader V.1.76 (I tested the Wireless version) is working flawlessly and it updates the firmware of my Az-GTI without any problem, once I made sure my Mac was connected to the Az-GTI network.
The Firmware Updater has no installer, so just run it as a command into your astrophotography bottle (as done for Autostakkert!). Don’t forget to create a launcher and add it to your Favourites.
You can read more in detail about updating the firmware of the Az-GTI (for example to enable it to run in equatorial mode) in this post.
Conclusions
CodeWaver’s CrossOver is an affordable way to simplify the use of Wine to run 32-bit and 64-bit software written for Windows on a Mac computer, both Intel and M1.
This allows us to have more tools for our astrophotography as well as to maintain and update astrophotography gear, as the software is usually Windows only.
Of course, if 59 euro is a price you don’t want to pay, WineHQ is free and maybe you will have better luck than me and will be able to properly install on your computer.
Pros
Easy to use;
You don’t need Windows;
Probably the best option to date if you own an Apple M1 computer;
Affordable (compared to most commercial virtualisation software);
Many astrophotography software (both 32-bit and 64-bit) among the most common ones can run with CrossOver;
Software has decent performances;
Two-weeks free trial period available on request;
Cons
Major updates are not free, although they are discounted if you already own a CrossOver license;
Sharpcap is not working well (or at all);
Need to carefully test the software you intend to use during the trial period;
Further Readings
I have written three articles about astrophotography software for NightSkyPix: